How to Install Your Synology NAS
Setting up your Synology NAS is straightforward. Follow these steps to get started:
Step 1: Install the Hard Drives
- Access Drive Bays: Locate the drive bays at the front of your Synology NAS. Some models have a removable front panel.
- Insert Drives:
- Remove Drive Tray: Pull out the drive tray.
- Mount Drive: Place your hard drive into the tray and secure it. For 2.5-inch drives, use screws as indicated.
- Reinsert Tray: Slide the loaded tray back into the NAS.
- Repeat: If using multiple drives, repeat the process for each.

Step 2: Connect to the Network
- Power On: Turn on your NAS.
- Network Connection: Use an Ethernet cable to connect the NAS to your router for a stable connection.
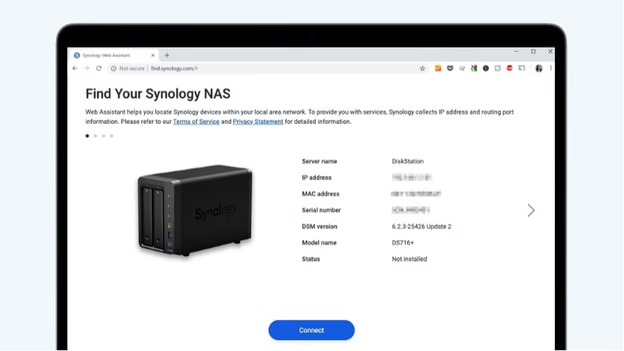
- Access via Browser:
- On a computer connected to the same network, open a web browser.
- Navigate to find.synology.com.
- Your NAS should appear; click ‘Connect’ to proceed.
Step 3: Install DSM (DiskStation Manager)
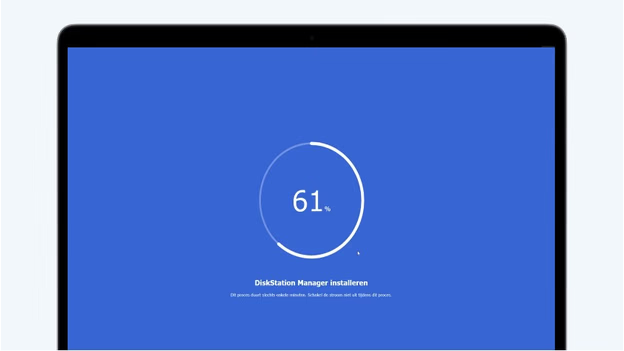
- Start Installation: After connecting, click ‘Install’ to begin setting up the DSM software.
- Automatic Installation:
- Select the automatic installation option.
- Note: This process will erase all data on the installed drives.
- Click ‘Next’ and then ‘Confirm’ to proceed.
- Wait: The installation will take approximately 10 minutes.
Step 4: Configure System Settings
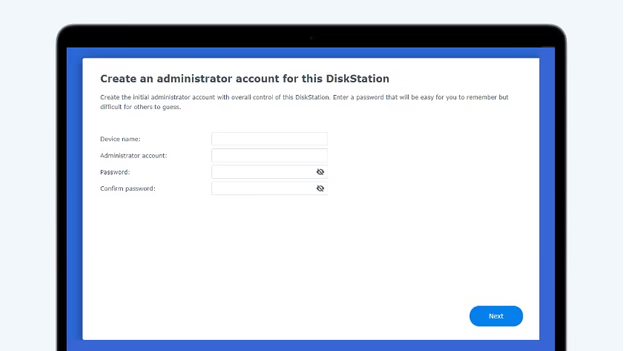
- Device Name: Assign a name to your NAS; this will be visible on your network.
- Administrator Account:
- Create an admin username and a strong password.
- Store these credentials securely.
- Update Preferences: Choose your preferred update settings:
- Automatic Updates: Recommended for essential DSM and package updates.
- Manual Updates: If you prefer to control the update process.
- Finalize: Complete the setup to access the DSM desktop.
Step 5: Set Up Storage Pool and Volume
- Open Storage Manager: In the DSM, navigate to ‘Storage Manager’.
- Create Volume:
- Click on the ‘Volume’ tab and select ‘Create’.
- Setup Type: Choose ‘Better Performance’ for a single volume or ‘Higher Flexibility’ for multiple volumes.
- RAID Configuration: For automatic setup, Synology Hybrid RAID (SHR) is recommended.
- Select Drives: Choose the drives to include in the volume.
- File System: Opt for Btrfs for advanced features.
- Initialize: Proceed with the setup. The NAS will perform a parity check but remains usable during this process.

Step 6: Create Shared Folders
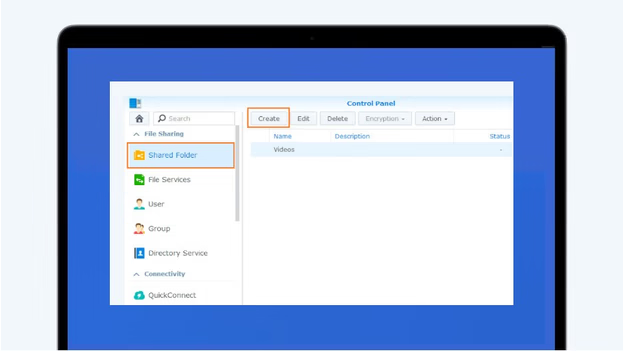
- Access Control Panel: Go to the ‘Control Panel’ in DSM.
- Shared Folder:
- Click on ‘Shared Folder’ and then ‘Create’.
- Name and Description: Enter a name and description for the folder.
- Volume Selection: Choose the appropriate volume.
- Permissions: Set user access rights as needed.
- Finalize: Complete the creation process.
Step 7: Enable External Access
- QuickConnect Setup:
- In the ‘Control Panel’, navigate to ‘External Access’ under ‘Connectivity’.
- Go to the ‘QuickConnect’ tab and enable QuickConnect.
- Synology Account: Sign in or create a Synology account if prompted.
- QuickConnect ID: Create a unique ID for remote access.
- Access Your NAS Remotely:
- On external devices, use the QuickConnect ID to access your NAS via Synology’s mobile apps or through a web browser.
By following these steps, your Synology NAS will be set up and ready to use. For more detailed instructions, refer to Synology’s official documentation.